Mealworm Lifecycle Explained (Egg to Beetle) — Complete Farming Guide
If you want to become a successful mealworm farmer, the first thing you must understand is the mealworm lifecycle. Every stage—egg, larva, pupa, beetle—plays a different role in your production. When you learn how long each stage lasts, how to care for it, and how to keep worms healthy, your farming productivity increases dramatically. This process is part of the fundamentals covered in Mealworm Farming Basics.
This complete guide explains the entire lifecycle of mealworms in simple, clear language, along with tips used by professional farms to increase growth, survival rate, and egg production.
Mealworm Life Cycle Timeline:
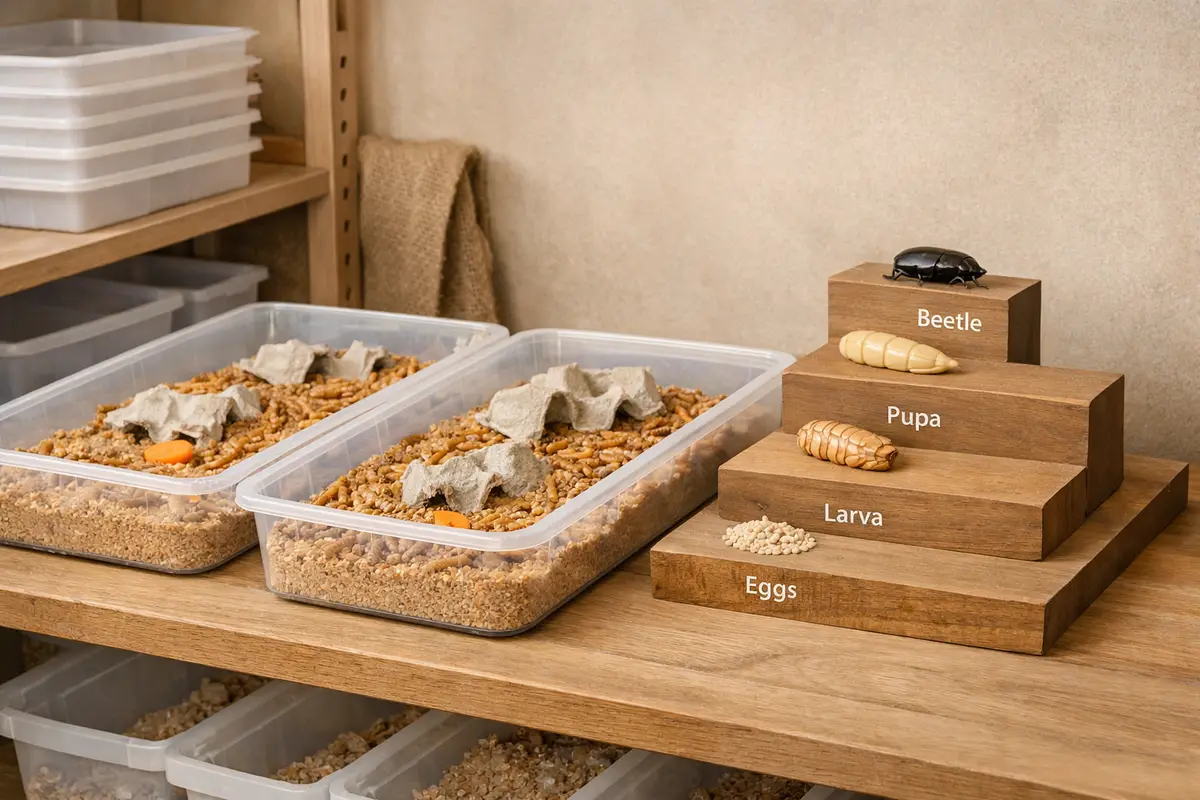
The mealworm life cycle consists of four stages: egg, larva (mealworm), pupa, and adult beetle. Under proper temperature and feeding conditions, eggs hatch within 7–14 days. Larvae grow for 6–10 weeks before turning into pupae. Pupae transform into beetles within 7–10 days, and beetles start laying eggs within a few days.
⭐ 1. Mealworm Lifecycle Overview (4 Stages)
A mealworm goes through four major stages:
- Egg
- Larva (Mealworm)
- Pupa
- Beetle
The complete cycle typically takes 8–12 weeks, depending on temperature and feeding.
Let’s go through each stage in detail.
⭐ 2. Stage 1: Egg (The Beginning of New Life)
Mealworm beetles lay tiny white eggs in soft bedding.
Appearance:
Small, white, oval-shaped, size of dust particles.
Egg Laying Rate:
Each beetle lays 300–500 eggs in its lifetime.
Egg Laying Duration:
Beetles lay eggs for 8–12 weeks.
Hatching Time:
Eggs hatch in 7–14 days, depending on temperature.
Ideal Conditions for Eggs:
- Soft, fine bedding (wheat bran)
- Temperature around 25°C
- Dark environment
- Low vibration
- No moisture near bedding
Farmer Tips: - Move beetles every 10–14 days to fresh bedding
- Eggs stay behind and hatch safely
- Avoid disturbing egg trays frequently
Removing beetles lets eggs develop without being crushed.
⭐ 3. Stage 2: Larva (Mealworm Stage)
This is the main stage for farming, because larvae become the mealworms you sell.
Appearance:
Yellow-brown worms, 1–2.5 cm long.
Duration:
6–10 weeks (depending on temperature and diet)
Growth Factors:
- Warm temperature (24–28°C)
- Good bedding
- Regular moisture
- Adequate space
- Clean environment
What Larvae Eat: - Wheat bran
- Oats
- Grower feed mix
- Moisture slices (carrot, potato, apple)
Larvae Behavior: - Eat constantly
- Bury into bedding
- Shed skin 10–15 times
- Grow rapidly in last 2 weeks
Farmer Tips for Larvae: - Keep bedding 6–8 cm deep
- Feed small moisture slices 2–3 times a week
- Stir bedding weekly
- Maintain airflow
- Avoid overcrowding
Healthy larvae = high-quality dried mealworms.
⭐ 4. Stage 3: Pupa (Transformation Stage)
Pupae are the stage where worms become beetles.
Appearance:
White, soft, curled, no movement except small twitch.
Duration:
7–10 days before turning into beetles.
Important Facts:
- Pupae do NOT eat
- Must be kept dry
- Must be separated from larvae
- Larvae may eat pupae if kept together
Farmer Tips for Pupae: - Keep pupae in separate dry trays
- No bedding required
- Lay them on egg trays, mesh, or tissues
- Remove dead pupae immediately
- Avoid touching with wet hands
Separation increases pupae survival from 50% to 90%.
⭐ 5. Stage 4: Beetle (Reproduction Stage)
After pupae transform, they turn into Darkling Beetles.
Appearance:
- Day 1–2: White
- Day 3–7: Brown
- Day 8+: Black (fully mature)
Lifespan:
2–3 months (60–90 days)
Egg Production:
Beetles lay eggs weekly for 8–12 weeks.
Ideal Conditions for Beetles: - 24–28°C temperature
- Fine bedding
- Carrot daily
- Dry, dark space
- No moisture touching bedding
Farmer Tips: - Move beetles to new bedding every 10–14 days
- Use shallow bedding (2–3 cm)
- Add egg trays for hiding and comfort
- Avoid overcrowding
Healthy beetles = strong egg production.
⭐ 6. Full Lifecycle Timeline (Week-by-Week)
Here’s the complete timeline for one generation:
Week 1–2:
Eggs hatch into tiny larvae.
Week 3–6:
Larvae grow rapidly, shed skin multiple times.
Week 7–9:
Larvae reach full size and turn into pupae.
Week 9–10:
Pupae transform into beetles.
Week 10–20:
Beetles lay eggs, creating the next generation.
Total cycle:
8–12 weeks (depending on temperature and feeding)
⭐ 7. How Lifecycle Affects Your Farm Production
If you understand the lifecycle, you can:
- Increase production
By separating trays and collecting eggs efficiently. - Speed up growth
By maintaining ideal temperature. - Reduce losses
By protecting pupae from larvae. - Plan your sales
By tracking larvae size and maturity. - Scale your business
By increasing beetle trays for more eggs.
If you’re searching for practical guidance on how to mealworms farming works, starting with the basics makes everything easier.
⭐ 8. Temperature & Humidity Effects on Lifecycle
Mealworm growth rate is highly affected by climate.
⭐ 8.1 Ideal Temperature for All Stages:
24°C – 28°C
Low temperature = slow growth
High temperature = deaths
⭐ 8.2 Humidity Level:
40–60% is ideal.
High humidity causes:
- Mold
- Dead worms
- Wet bedding
- Slow growth
Low humidity causes: - Slow egg hatching
- Dry beetles
- Dehydrated larvae
⭐ 9. Why Separation Is Critical
You must separate these stages:
Egg trays
Larvae trays
Pupae trays
Beetle trays
Benefits of separation:
- Faster growth
- Less cannibalism
- Cleaner trays
- Better ventilation
- Higher survival rate
- Consistent production
Professional mealworm farms follow strict separation schedules.
What Do Mealworms Turn Into?
Mealworms turn into darkling beetles after completing their growth cycle. The transformation follows complete metamorphosis: egg, larva, pupa, and beetle. Adult beetles are essential for breeding, as they lay eggs that start the next generation of mealworms.
How Long Is the Life Cycle of a Mealworm?
The complete life cycle of a mealworm usually takes between 8 and 12 weeks, depending on temperature, bedding quality, and feeding practices. Warmer temperatures and proper nutrition help shorten the cycle, while cold conditions can slow down growth significantly.
⭐ 10. Troubleshooting Lifecycle Problems
Here are common issues and solutions.
❌ Problem 1: Slow growth
Cause: Cold temperature
Fix: Maintain 24–26°C
❌ Problem 2: Pupae dying
Cause: Larvae eating pupae
Fix: Keep pupae separate
❌ Problem 3: Beetles not laying eggs
Cause: Dry beetles or old beetles
Fix: Add carrot daily
Replace beetles every 10–12 weeks
❌ Problem 4: Too many small worms
Cause: Low nutrition bedding
Fix: Add oats + grower feed
❌ Problem 5: Worms turning black
Cause: Wet bedding or rotten moisture
Fix: Remove moisture, change bedding
⭐ 11. Pro Tips to Improve Lifecycle Productivity
These tips make your farm grow faster and stronger.
⭐ 11.1 Use soft, fine bedding for beetles
Ensures safe egg laying.
⭐ 11.2 Add moisture daily for beetles
Hydrated beetles = more eggs.
⭐ 11.3 Keep trays dark
Mealworms thrive in darkness.
⭐ 11.4 Maintain clean trays
Clean bedding boosts survival.
⭐ 11.5 Never disturb egg trays
Eggs are extremely delicate.
⭐ 11.6 Rotate beetles every 10–14 days
Separates new eggs from beetles efficiently.
⭐ 12. Final Conclusion
Understanding the mealworm lifecycle is the foundation of successful farming. When you know how eggs hatch, how larvae grow, how pupae transform, and how beetles reproduce, you can optimize every stage for maximum output. For reproduction control, see How to Grow Mealworms Faster. By maintaining proper temperature, clean bedding, regular moisture feeding, and separating trays at the right time, your farm becomes more productive and profitable.
Mastering the lifecycle means mastering the entire mealworm business. With proper care and techniques, you can scale your farm confidently and build a long-term income source in Pakistan’s growing insect farming market.
- “How to Grow Mealworms Faster”
- “Mealworm Feeding Guide”
- “Best Bedding for Mealworms”
- “Best Trays for Mealworm Farming”
- “Mealworm Farming at Home in Pakistan”