Mealworm Lifecycle Explained (Egg → Larvae → Pupae → Beetle)
Mealworm Lifecycle Explained (Egg → Larvae → Pupae → Beetle)
Understanding the mealworm lifecycle is the foundation of every successful mealworm farming business. Whether you’re raising mealworms for poultry feed, fish farms, reptile owners, pet food companies, or organic growers, mastering the timing and behaviour of each stage helps you produce bigger colonies, faster growth, and higher profits. Lifecycle understanding is part of Mealworm Farming Basics.
This guide explains the complete lifecycle of Tenebrio Molitor in simple and practical terms. You’ll learn the duration, ideal conditions, feeding requirements, how to separate stages, common mistakes, and how to make your mealworm colony reproduce faster.
Let’s begin.
⭐ 1. Why Learning the Lifecycle Matters
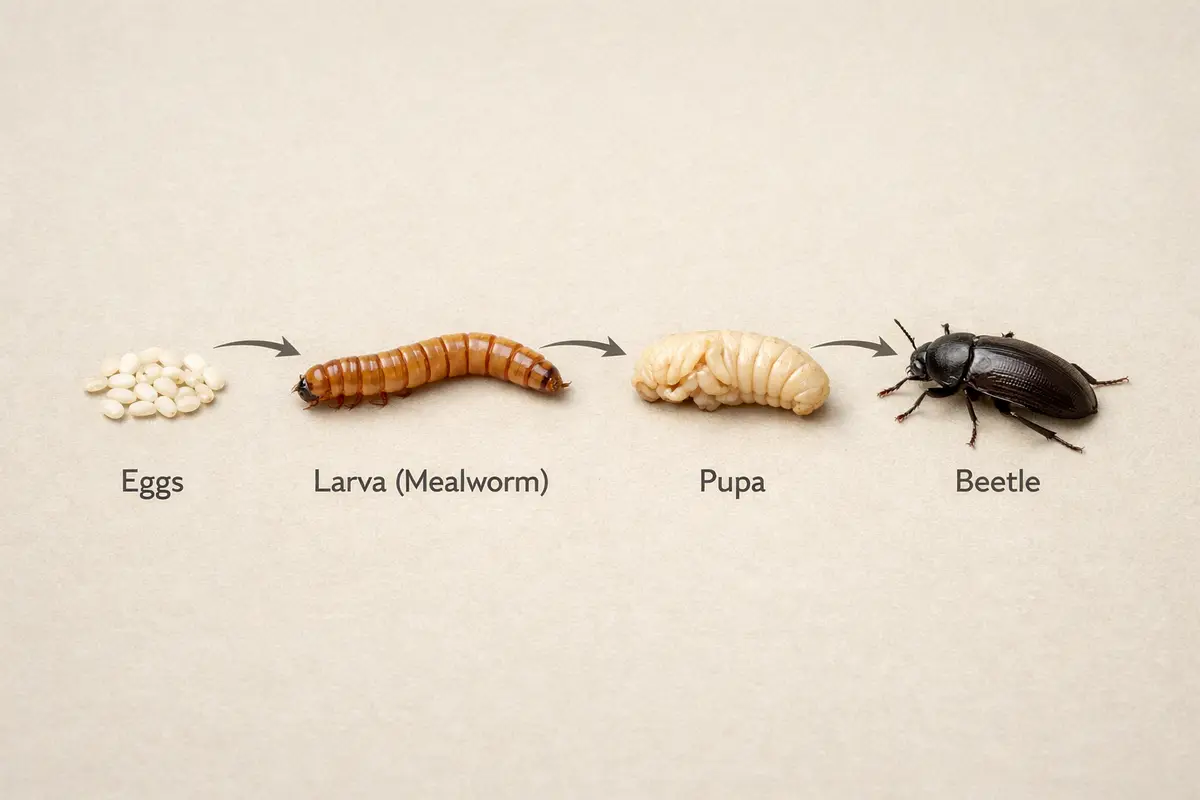
Mealworms pass through four stages:
- Egg
- Larvae (mealworms)
- Pupae
- Beetle
Each stage has its own temperature, food, and space requirements. Once you understand how and when to separate them, you’ll:
- Increase production speed
- Reduce cannibalism
- Get cleaner trays
- Avoid contamination
- Create a predictable monthly output
- Achieve high-quality dried mealworms for sale
This turns a simple hobby setup into a profitable, scalable mealworm farming system.
⭐ 2. Stage 1: Egg Stage
Mealworm eggs are tiny, oval, and white. They’re nearly invisible inside the bedding, which is why most beginners never see them.
Key Facts About Egg Stage
- Size: As small as dust grains
- Color: White to off-white
- Duration: 7–14 days
- Laid by: Adult beetles
- Quantity: 300–500 eggs per female beetle
- Location: Inside bedding, under trays, or near moisture
Ideal Conditions - Temperature: 24–28°C
- Humidity: Low
- No direct moisture touching bedding
Common Beginner Mistake
Shaking beetle trays too early.
This destroys eggs.
Eggs are delicate, so avoid unnecessary vibration or movement. Simply lift and shift beetles every 2 weeks, not sooner.
Tip: Increase Egg Production - Use fine bedding like wheat bran
- Add small moisture slices daily
- Keep beetles well-fed
- Ensure soft corners in trays (beetles prefer laying there)
⭐ 3. Stage 2: Larvae Stage (Mealworms)
This is the stage where worms grow into the actual product you sell.
Key Characteristics
- Duration: 8–10 weeks
- Size: 2–3 cm (full-grown larvae)
- Color: White → yellow → golden
- Activity: Very active, high feeders
- Value: This is the stage that earns you money
Feeding Requirements
Mealworms eat bedding. Use: - Wheat bran
- Oat bran
- Crushed oats
- Poultry grower feed (optional)
Moisture Sources - Carrots
- Apples
- Potatoes
- Slight cucumber slices
Avoid anything wet that molds quickly.
Temperature for Growth - Optimal: 20–28°C
- Below 15°C: Growth slows
- Above 32°C: Risk of death
How to Grow Larvae Faster - Maintain stable temperature
- Keep bedding fresh
- Provide moisture three times a week
- Separate larger larvae from small ones
- Use deeper bedding (6–8 cm)
When to Harvest
Harvest when larvae turn golden and thick, with firm bodies.
If you’re searching for practical guidance on how to mealworms farming works, starting with the basics makes everything easier.
⭐ 4. Stage 3: Pupae Stage
The pupae are white, soft, and unmoving. Many beginners think they are dead — but they’re not.
They’re transforming into beetles.
Key Facts
- Duration: 7–10 days
- Does not eat
- Needs to stay dry
- Must be separated; beetles can eat them
- Very sensitive to moisture and vibration
Why Separation Is Important
Larvae sometimes chew on pupae.
Beetles can attack pupae.
Moisture can kill them.
So pupae must be placed in a dry, low-traffic tray.
Ideal Conditions - Temperature: 22–28°C
- Humidity: Very low
- Bedding: None needed (optional tissues or egg trays work)
Pupae Care Tips - Keep them in a single layer
- Remove dead pupae gently
- Don’t add vegetables or moisture
- Let them darken into beetles naturally
This stage is delicate but crucial for fast colony expansion.
⭐ 5. Stage 4: Beetle Stage
Beetles are the “parents” of your mealworm farm. Their only job is to mate and lay eggs.
Key Facts About Beetles
- Lifespan: 8–12 weeks
- Start laying eggs: Within 7 days
- Eggs per beetle: 300–500
- Color: White → brown → black
- Behavior: Active, loves climbing
Beetle Management
To avoid overcrowding: - Keep bedding shallow
- Add egg trays as hiding spots
- Move beetles every 2 weeks to fresh bedding
- Avoid moisture inside beetle trays
Boosting Egg Laying - Maintain 26–28°C
- Add moisture (carrot slices) daily
- Give them calm trays with deep corners
- Replace bedding after every lay cycle
The healthier your beetles, the more eggs you will get.
⭐ 6. Complete Lifecycle Timeline (Clear Breakdown)
Stage Duration Purpose Notes
Egg 7–14 days Start of colony Very small, avoid shaking trays
Larvae 8–10 weeks Commercial product Needs frequent food + moisture
Pupae 7–10 days Transformation Must be separated
Beetle 8–12 weeks Lays eggs Move every 2 weeks
⭐ 7. How to Separate Each Stage (Beginner Method)
Separation is the secret to a high-yield mealworm farm.
For Eggs
Just move beetles every 2 weeks.
Eggs remain in old bedding.
For Larvae
Use a mesh sifter.
Large worms stay above, small ones drop.
For Pupae
Use tweezers or fingers.
Transfer daily or every 2 days.
For Beetles
Lift beetles gently into a fresh tray.
⭐ 8. Common Problems in the Lifecycle — And Fixes
Problem 1: Slow Growth
Cause: Low temperature
Fix: Maintain 22–28°C consistently
Problem 2: Mold in Bedding
Cause: Too much moisture
Fix: Smaller vegetable slices, better ventilation
Problem 3: Pupae Dying
Cause: Mixed with larvae/beetles
Fix: Mandatory separation
Problem 4: Beetles Not Laying Eggs
Cause: Stress or overcrowding
Fix: Fresh bedding every 2 weeks
Problem 5: Larvae Turning Black
Cause: High humidity or bad bedding
Fix: Replace bedding and add airflow
⭐ 9. How Lifecycle Affects Production & Profit
A stable lifecycle means:
- Constant production
- Predictable monthly output
- Faster scaling
- Higher-quality mealworms
- Better survival rate
- Bigger profit margin
Most farmers fail because they don’t separate stages properly.
Once you do that, production increases by 300–500% in just 3 months.
⭐ 10. Internal Linking Suggestions
From this article, link to:
- “Mealworm Farming Setup Cost in Pakistan”
- “How to Start Mealworm Farming at Home”
- “Best Bedding for Mealworms”
- “How to Grow Mealworms Faster”
- “How to Separate Larvae, Pupae, Beetles”
⭐ 11. Final Conclusion
The mealworm lifecycle is simple but must be managed properly. Once you understand the behavior and needs of each stage—eggs, larvae, pupae, and beetles—you can grow a mealworm farm that produces consistently, remains healthy, and becomes highly profitable. For faster production, read How to Grow Mealworms Faster.
With proper temperature, fresh bedding, clean separation, and stable moisture control, mealworm farming becomes one of the most beginner-friendly and scalable agriculture businesses today.